



Orlando Airport Map: Complete Guide to Navigating MCO Terminals, Gates, Trains, Parking, and Ground Transport
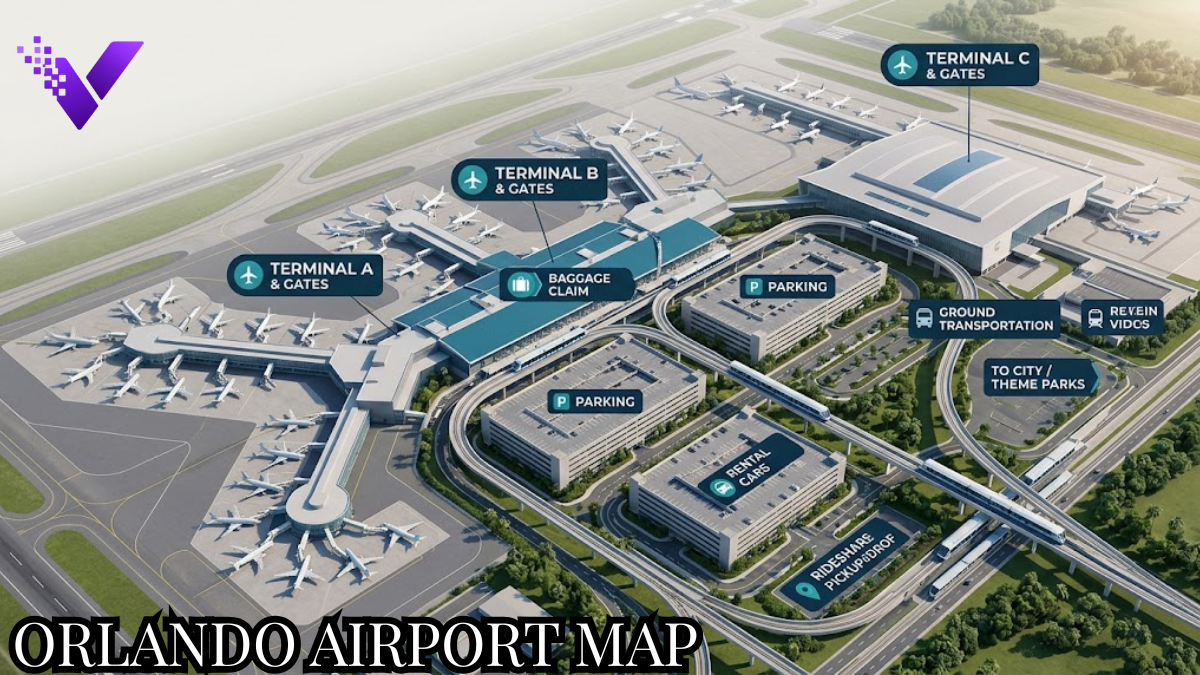
Orlando International Airport is large enough that knowing a gate number alone is not always enough. Terminals A and B share the main north terminal complex, while Terminal C sits south of them beside the airport train station.
A good Orlando Airport map helps you answer three questions before you start walking: Which terminal? Which level? Which gate area? That matters when you are connecting between flights, collecting baggage, reaching a rental car, or transferring to Brightline.
The layout is also changing. MCO is upgrading parts of its Gate Link system serving Gates 70–129, while other terminal, parking, concession, and passenger-facility projects continue through the airport’s capital improvement program.
What Is the Orlando Airport Map?
The Orlando Airport map is a visual layout of Orlando International Airport—airport code MCO—showing its terminals, passenger levels, gate areas, transportation links, parking garages, baggage facilities, rental-car locations, and train station.
The basic airport structure is easier to understand when you separate Terminals A/B from Terminal C. Gates 1–129 use the A/B complex and its Gate Link trains, while Terminal C operates its own security checkpoint and gate area.
High-level passenger flow:
Airport entrance → Find terminal → Find correct level → Check in → Security → Gate Link/walk → Departure gate
For arrivals:
Aircraft → Gate area → Terminal → Baggage claim → Ground transport / rental car / parking / train
For an A/B-to-C transfer:
Terminal A/B Level 3 → Terminal Link → Train Station area → Pedestrian connection → Terminal C
Why Is the Orlando Airport Map Important?
Using the Orlando Airport map before arriving can prevent several common navigation problems:
- Terminal confusion: Terminal C is not simply another side of the A/B building.
- Wrong security checkpoint: Gates 1–59 and Gates 70–129 use different security areas in the A/B complex.
- Missed connections: Some movements involve a Gate Link train rather than a direct corridor.
- Level mistakes: Check-in, baggage claim, rideshare, rail access, and rental cars may sit on different floors.
- Ground-transport delays: Pickup zones vary by terminal and transportation type.
- Unnecessary walking: Knowing whether you need the Terminal Link, Gate Link, bridge, elevator, or escalator cuts wasted movement.
- Parking errors: Garage C is particularly convenient for Terminal C and also connects to A/B by automated people mover.
- Rail-transfer confusion: Brightline operates from the dedicated Train Station beside Terminal C, rather than from the main A/B building.
Quick Reference Matrix
| Core Element | Action / What It Involves | Primary Goal / Output |
| Terminal A/B | Locate airline and gate range | Reach correct side of main complex |
| Terminal C | Follow dedicated C signage | Access C gates and facilities |
| Gate number | Match number to gate area | Select correct security/train path |
| Passenger level | Check floor before moving | Avoid vertical detours |
| Gate Link | Ride automated train within A/B system | Reach remote gate concourse |
| Terminal Link | Travel between A/B and south complex | Move toward Terminal C/train station |
| Train Station | Follow rail symbols and level signs | Reach Brightline |
| Parking garage | Match garage with terminal | Shorten terminal transfer |
| Ground transportation | Check terminal-specific pickup level | Find taxi, rideshare, bus, or shuttle |
| Rental cars | Confirm provider’s garage level | Collect or return vehicle correctly |
How to Read the Orlando Airport Map Step by Step
A map becomes useful only when you know which information to read first. Start with your boarding pass rather than searching randomly for an airline logo.
Step 1: Identify Your Gate Range
For passengers using Terminals A and B, MCO divides gates into four principal areas:
| Gate Range | Main Navigation Group |
| 1–29 | West-side security system |
| 30–59 | West-side security system |
| 70–99 | East-side security system |
| 100–129 | East-side security system |
| C230–C245 | Terminal C |
The airport states that Gates 1–59 share the west security area, while Gates 70–129 use the east security area beneath the Hyatt Hotel.
Terminal C currently uses gate numbers in the C230–C245 range on the airport’s published facility information.
Your boarding pass should therefore drive your route.
Example: Gate 112 means you should think 70–129 security zone first, not simply “Terminal B.”
Step 2: Understand Terminals A and B
A and B are best viewed as two sides of the same main terminal building, not two completely independent airport buildings.
Passengers can cross between Terminal A and Terminal B on Level 3. That same level provides access toward the Terminal Link used for the south terminal and train station.
The more important distinction after security is the gate group.
- Check your gate number.
- Find the corresponding security side.
- Clear security.
- Follow signs for the appropriate Gate Link.
- Board the automated train serving that concourse.
- Check monitors again after reaching the airside area.
Gate assignments can change, so a printed map should never replace the live departure displays.
Step 3: Learn the Gate Link System
The Gate Links are automated people movers connecting the central A/B terminal with remote gate concourses.
For example, a passenger moving between Gates 1–29 and Gates 30–59 may ride back toward the terminal and transfer to the other Gate Link while remaining inside the secured zone. The same general arrangement applies between Gates 70–99 and Gates 100–129.
MCO specifically warns passengers to remain within the secure area during these transfers. Entering the public terminal can mean passing through TSA again.
The Gates 70–129 train system is undergoing modernization in 2026. Daytime disruption is expected to be limited, but shuttle buses can be used during some overnight work periods.
Step 4: Navigate Terminal C by Level
Terminal C uses a noticeably different vertical layout from the older A/B complex.
According to MCO’s current terminal information:
| Level | Key Functions |
| Level 6 | Baggage claim, customs and immigration, meet-and-greet, some rideshare |
| Level 4 | Bridges toward Garage C and Ground Transportation Facility |
| Level 2 | Airline check-in and security/departure functions |
| Level 1 | Shuttles, Lost & Found, police and other ground services |
One useful detail for international travelers is Terminal C’s “Bags First” international-arrival process. Arriving international passengers retrieve checked baggage before proceeding through passport control in the facility’s international-arrival sequence.
Terminal C also differs from A/B because one security checkpoint serves its gates, allowing passengers who have cleared security to access the C gate area without choosing between two separate security zones.
Step 5: Move Between A/B and Terminal C
Do not treat Terminal C as a short hallway extension of Terminal B.
From Terminals A/B:
- Go to Level 3.
- Follow signs marked for Terminal C / Train Station.
- Locate the Terminal Link near the large blue C signage.
- Ride the automated people mover south.
- Follow directional signs after reaching the train-station complex.
- Continue toward Terminal C via the pedestrian connection.
The Terminal Link ride itself takes roughly four minutes, according to MCO, though the complete terminal-to-terminal journey takes longer after walking, vertical movement, and wayfinding are included.
Always build a buffer into a connecting itinerary.
Step 6: Find Brightline
Brightline’s airport station sits within the MCO Train Station complex next to Terminal C.
From Terminal C, travelers should:
- Reach Level 4.
- Cross the pedestrian bridge.
- Follow signs into the Train Station.
- Continue to Level 5 for the Brightline entrance.
Passengers starting in A or B should use the Terminal Link first, then continue upward to the rail station.
Brightline currently serves MCO with connections toward West Palm Beach, Boca Raton, Fort Lauderdale, Aventura, and Miami.
Step 7: Match Parking to Your Terminal
Parking location can affect the final section of your airport journey more than many drivers expect.
Garage C sits beside the south terminal complex. MCO describes it as within walking distance of Terminal C, while passengers traveling through A or B can use the Terminal Link.
Current reserved parking is available on Level 4 of Garage C. Airport parking guidance states that the walk between Garage C and Terminal C is about three minutes, while the connection toward A/B uses the automated people mover.
Do not assume that an online Garage C reservation works on another level. Reserved customers are specifically directed to the designated Level 4 reservation area.
Step 8: Locate Your Rental Car
Rental-car pickup is another area where checking the map before walking can save time.
On-airport companies use facilities connected with the A/B garages and Terminal C parking structure. Exact levels vary by provider.
For example, current airport listings show providers using locations including A/B Levels R1 or R2 and Terminal C Parking C1 or C2, depending on the rental company.
Treat your rental confirmation as the final authority because two companies operating from the same airport may use different return levels.
Orlando Airport Map for Different Travel Scenarios
First-Time Disney or Universal Visitors
Theme-park travelers often arrive with children, checked bags, strollers, and several pieces of luggage. Your priority should be locating baggage claim and the correct ground-transportation zone before leaving the terminal.
MCO has also introduced family-oriented spaces, including areas in Terminal A Level 1, Terminal B Level 3, and Terminal C near Gate 240.
Avoid having the entire group move blindly through the building. One adult can confirm the pickup zone first while the rest remain together near baggage claim.
International Arrivals
International passengers should pay special attention to arrival level rather than departure level.
At Terminal C, customs, immigration, international baggage handling, and the meet-and-greet area center heavily around Level 6.
Your next movement may be downward toward ground transportation rather than toward the departures floor.
Brightline Passengers Connecting to a Flight
A rail-to-air connection requires thinking in levels as well as distance.
Brightline is on Train Station Level 5. Terminal C passengers cross the pedestrian bridge, while passengers departing from A/B continue to the Terminal Link before following signs toward their applicable security checkpoint.
Travelers With Mobility Needs
MCO lists accessible public restrooms and accessibility facilities throughout the complex. Wheelchair assistance is generally arranged through the passenger’s airline, while airport skycaps can provide additional assistance.
Travelers requiring assistance should identify elevator routes on the terminal layout rather than planning around escalators.
Travelers With Pets or Service Animals
Relief-area placement varies significantly by gate zone.
Post-security locations are available within the 1–29, 30–59, 70–99 and 100–129 areas, while Terminal C has relief areas near C236, C241, and C242 according to the airport’s accessibility information.
That makes gate-specific planning more useful than searching for a single airport-wide pet area.
Terminal A/B vs Terminal C: Direct Comparison
| Factor | Terminals A/B | Terminal C |
| Basic design | Shared north terminal complex | Separate south terminal |
| Security structure | Two primary security zones | One main checkpoint |
| Gate identification | Numerical gate ranges | C-prefixed gates |
| Airside movement | Gate Link trains used extensively | More unified gate access |
| Rail access | Terminal Link required | Adjacent to Train Station |
| Brightline connection | Transfer south first | Pedestrian bridge connection |
| International-arrival design | Varies by flight/gate operation | Dedicated top-level arrivals process |
| Parking relationship | Garages A/B most intuitive | Garage C directly adjacent |
| Navigation approach | Gate range is critical | Floor level is especially important |
Common Mistakes & Best Practices
Common Mistakes to Avoid
- Following “Terminal A” or “Terminal B” without checking the gate number. Gate ranges provide more useful routing information inside the main complex.
- Leaving the secure area during an airside transfer. Some transfers can be completed without another TSA screening if you stay on the designated route.
- Assuming Terminal C is directly attached to B. Reaching it involves the south Terminal Link/train-station complex.
- Going to the first rental-car floor you see. Company pickup and return locations differ.
- Using an old screenshot as the only navigation source. Airport construction and operational arrangements can change.
- Ignoring the floor number. At Terminal C, services can be separated by several vertical levels.
- Walking toward Brightline without checking station level. The rail entrance is on Level 5, not at terminal curb level.
How to Maximize Navigation Efficiency
- Screenshot your boarding pass, not just the terminal diagram.
- Save the latest official MCO terminal map before leaving your hotel.
- Compare your airline app’s gate assignment with an airport display after arrival.
- Use major anchors—Hyatt Hotel, blue Terminal C signage, Train Station and Garage C—when orientation becomes confusing.
- Photograph your parking level and nearest elevator marker before entering the terminal.
- Keep rental-car details accessible offline in case cellular service becomes slow.
- Set a meeting point when traveling as a group instead of relying on “meet me at baggage claim.”
- Use elevators deliberately when carrying large bags; moving between multiple MCO levels with luggage can be slower than the horizontal distance suggests.
Future and Modern Trends at MCO
The Orlando Airport map is becoming more dynamic because airport infrastructure is changing faster than a printed diagram can show.
MCO’s current improvement program includes Gate Link modernization, terminal renovations, added concessions, baggage-system work, parking improvements, and future gate capacity. The airport has stated that its multi-year capital plan includes at least seven additional gates for the Airside 2/Gates 100–129 area.
Parking navigation is also becoming more data-driven. MCO announced a Parking Guidance System for Garage C, with expansion toward Garages A and B planned afterward.
Terminal C continues to evolve as well. Airport planning includes a new rental-car lobby and additional passenger-flow improvements within the terminal complex.
Digital navigation will matter more as those projects open. The practical shift is from a static “where is my terminal?” map toward live wayfinding tied to changing airport operations.
Practical Pre-Flight Checklist
Use this before leaving for MCO:
- Boarding pass downloaded for offline access
- Gate range visible
- Airline terminal confirmed on travel day
- Correct departure level identified
- Connection time checked against terminal change
- Parking garage and vehicle location saved
- Rental-car provider’s exact return floor confirmed
- Ground-transport pickup instructions stored
- Brightline ticket and station level saved when applicable
- Wheelchair or airline assistance arranged in advance if required
- Family meeting point agreed
- Latest gate assignment rechecked after reaching MCO
- Live airport signs given priority over an older saved diagram
Final Thoughts
A useful Orlando Airport map is less about memorizing every restaurant, restroom, or corridor and more about understanding MCO’s structure: gate range, terminal, level, and transport link.
Check your gate again on travel day. MCO is actively upgrading parts of the airport, so combine the official map with live flight displays and on-site signs rather than depending on a static image alone.
Frequently Asked Questions – FAQs
Is Orlando International Airport the same as MCO?
Yes. MCO is the IATA airport code for Orlando International Airport in Orlando, Florida.
Do not confuse it with other Central Florida airports when booking transportation or rental cars.
Can you walk from Terminal A to Terminal B at Orlando Airport?
Yes. Terminal A and Terminal B are opposite sides of the same main terminal complex, and passengers can cross between them on Level 3.
Your gate number still determines which security and Gate Link area you need.
Can you walk from Terminal B to Terminal C?
The normal connection uses the Terminal Link system and the south train-station complex, rather than treating Terminal C as an ordinary adjacent concourse.
From A/B, follow the Terminal C signs on Level 3 and use the automated people mover.
Where is the Brightline station at Orlando Airport?
Brightline operates from the dedicated MCO Train Station beside Terminal C.
The Brightline entrance is on Level 5. Travelers coming from Terminal C use the pedestrian bridge; A/B passengers first take the Terminal Link.
Does Terminal C have its own security checkpoint?
Yes. Terminal C has one security checkpoint serving its gate area, unlike the divided security arrangement used for the major A/B gate groups.
That simplifies movement among C gates after screening.
What gates are in Terminal C at MCO?
Current airport information identifies the active Terminal C area around Gates C230–C245.
Always verify the exact gate using your airline app or airport display because operational assignments can change.
Where can I get the latest official Orlando Airport map?
MCO publishes current terminal layouts on its official Terminal Maps page, including maps for A/B, Terminal C, and the Train Station.